Блог:ROSA Planet
A technical blog of ROSA Laboratory.
All content is published under Creative Commons Attribution-ShareAlike 3.0 License (CC-BY-SA)
Please, subscribe to RSS/Atom feed. If you have any questions do not hesitate to contact us
Helping ROSA Maintainers To Update Programs
One of the most frequent kind of ROSA users' requests is request to update some package in our repositories. Unfortunately, we can't satisfy all update requests immediately. However, every community member can easily help us with it, since with our current build infrastructure you can update packages even if you are not programmer or maintainer at all. In many cases basic knowledge of web browser is enough.
Assume that you have noticed a new release of your favorite application and want to update corresponding package in ROSA repositories. Consider for example a popular Atom code editor - right now ROSA repositories provide atom 1.2.0, but 1.3.2 was released several days ago. Let's try to update the ROSA package!
First of all, please register at our ABF build environment at http://abf.io. Registration is free, doesn't require any kind of confirmation and you will be able to log in into ABF just after registration is complete.
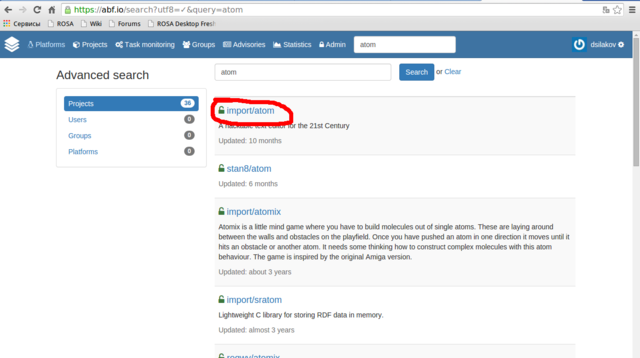
Then please find a project corresponding to your package - in our case we need atom project in the import group (always use the import group since it is contains projects built into our official repositories!).
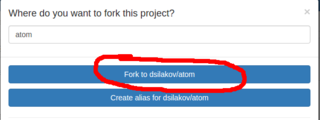
Go to the project found and press "Fork".
In the dialog appeared choose Fork to <your_login>/atom. This will fork the project into your personal namespace where you are free to modify it as you wish. The forking is fast and you will be immediately redirected to a page of the forked project. If you see a message that repository is empty then just reload the page.
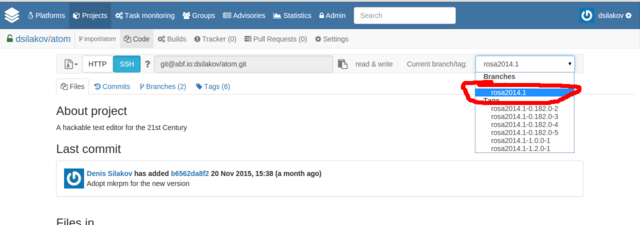
NExt step is to switch to the rosa2014.1 branch of the Git repository. If you doesn't understand what this means - don't worry, you just have to choose "rosa2014.1" in dropdown list at the upper-right corner of the page. We use "rosa2014.1" branch starting from ROSA Desktop Fresh R4 and will continue to use it at least in R7.
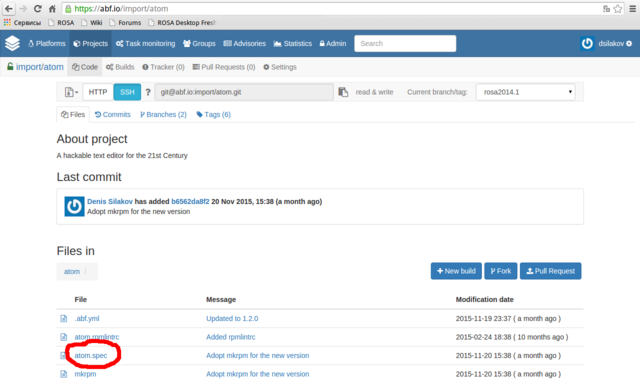
Now please find a file with the .spec extension among project files (atom.spec in our case), click on it and then click Edit to modify it.
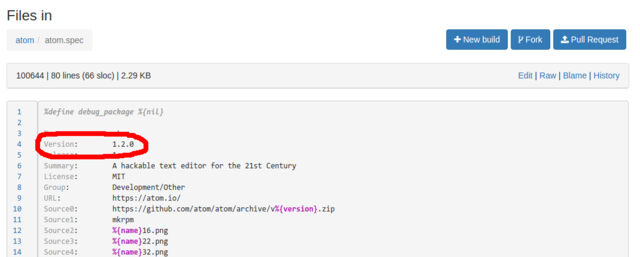
All that you should do in this file is to update Version tag which is usually located near the top of the file. As we can see, currently this tag is set 1.2.0 and we will replace this value with 1.3.2. Please also write some valuable message (e.g., "Updated to version 1.3.2") in the "Commit message" text area. And that's all - save file by means of corresponding button at the bottom of the page.
In the previous step we have prepared ABF to build a new version of our program. Now it is time to click on "New Build" and perform a couple of actions in the page appeared:
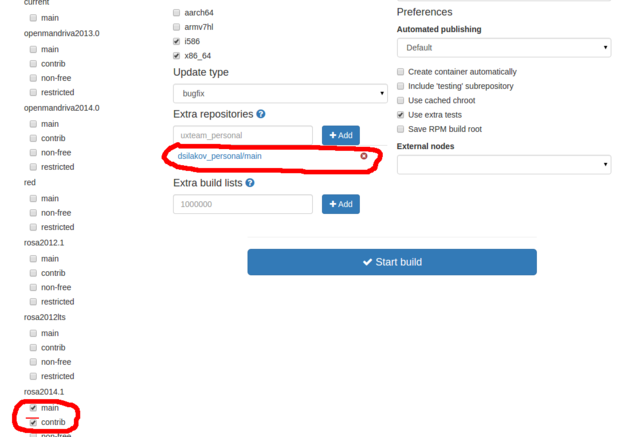
- detach your personal repository from the build by clicking on a cross sign near it
- attach Contrib repository by activating "contrib" checkbox item in the "rosa2014.1" section
Now press "Start Build" and wait for result. If the build fails - well, the easy-way update didn't work in this case and it is time to ask maintainers or improve your own skills and dig deeper into package build procedure. But if the build succeeds, you will be able to download packages with the new version of your application. Feel free to download and test them.
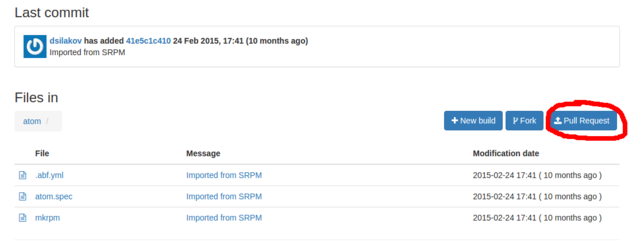
If the new version works fine, feel free to share this updates with the whole ROSA community. To do this, just press the "Pull Request" button at your project page.
Make sure that you have specified "rosa2014.1" branch for both source and target projects, press "Update commits" button if it becomes visible, write some message in the "Description" field and click on "Send Pull Request".
ROSA maintainers will receive you request, review it and likely accept and build the updated package into official repositories.
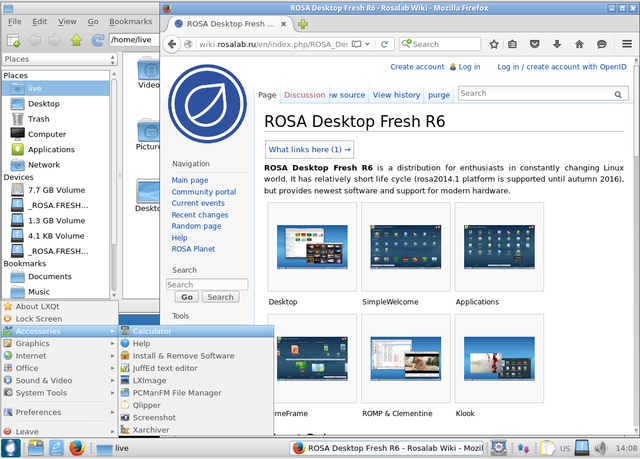
ROSA Desktop Fresh R6 LXQt
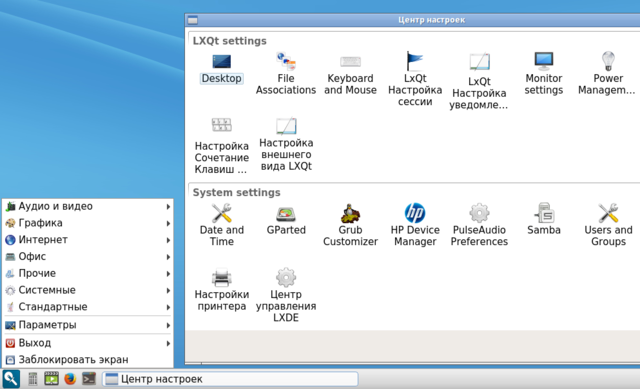
After several months of ROSA Desktop Fresh R6 KDE release, we are happy to announce a lightweight edition of Desktop Fresh R6 which uses LXQt desktop environment.
Up to Desktop Fresh R5, we used to release lightweight editions on the basis of LXDE. However, LXDE is based on GTK+2 library stack which didn't get significant updates since the year 2011 - all new features are now implemented in the GTK+3 series. However, migration from GTK+2 to GTK+3 is not smooth and some developers are not happy with the ew stack. In particular, after experiments with GTK+3 many LXDE developers decided to consider Qt as an alternative and in the year 2013 they decided to merge with Razor-qt project and create a new Qt-based lightweight desktop environment named LXQt.
The old GTK+2-based LXDE is not dead and is still developed by a group of volunteers, but their progress is not as significant as LXQt's one. In particular, there was almost no significant difference in LXDE components between LXDE editions of ROSA Desktop Fresh R4 and Fresh R5. But our distributin has a "Fresh" word in its name, so we decided to give a chance to a new desktop environment. And after several months of experiments, integration work and bug fixes, we are ready to present a new edition of ROSA Desktop Fresh which is based on LXQt.
This release is based on LXQt 0.10.0 - the latest LXQt version at the moment. LXQt is built with Qt5 framework and the Desktop Fresh LXQt edition tends to include applications that also use Qt5, in particular:
- PCManFM-Qt file manager
- qterminal terminal emulator
- lximage-qt image viewer
- trojita mail client
- qpdfview PDF-viewer
- qmmp audio player
- juffed text editor
- qlipper clipboard manager
However, we couldn't find Qt5 programs for all possible use cases, so Desktop Fresh R6 LXQt still provides several Gtk applications. The most noticable ones are LibreOffice and Firefox - we decided that it would not be a good idea to provide semi-functional analogues even if they are based on Qt5 (though volunteers are welcome to test otter-browser from our repositories which is based on Qt5 and tries to mimic Opera 12.x GUI).
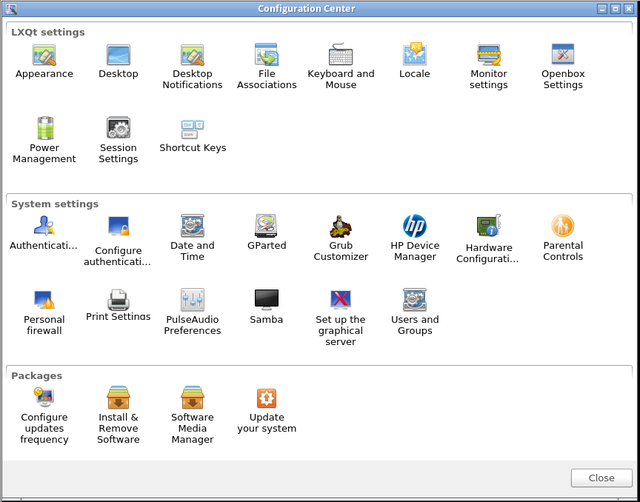
It is worth noting that LXQt has its own Control Center and ROSA-specific configuration tools such as "Install and Remove Programs" are smoothly integrated into it.
Desktop Fresh R6 LXQt uses SDDM desktop manager which is a recommended DM for Plasma 5, so it is likely that you will see it in futre KDE-based ROSA releases. Also note that this is the first ROSA release with a new default kernel - we have switched to 4.1 LTS branch.
Download
Minimal system requirements
- 256 Mb RAM (512 Mb is recommended fr installed system, 384 Mb - for the Live mode).
- 6 Gb HDD
- Pentium4/Celeron CPU
How to use USB device inside VM under Rosa Virtualisation (oVirt 3.5)
In our HOWTO we describe a task when you can use some USB device in VM under Rosa Virtualization (oVirt 3.5).
- You may want to use some HASP inside your VM for some reason.
- You may want to use other USB device, such as USB Flash drive for your VM, or use other USB storage device.
- You may want to use USB printer or USB cell modem inside your VM.
- You may need to use some other USB tokens, fingerprints devices, card readers, network cards, USB-to-RS232 devices, etc.
Or some more.... even iPod or iPhone :)
Before we start, I have to say about some important restrictions you need to know:
- Virtual machine which uses USB device will be running on the same host, where USB device has been attached.
- Your USB device must be attached to appropriate host system BEFORE you run VM, when you're plannig to use your USB device.
- If you use USB flash drive, or other USB storage device, and if storage device has been already mounted to host system in some mountpoint, a file system of the device will be unavailable for host system, after you mount your device inside your VM.
- You must edit VM properties to enable USB support (in Console options menu), we recommend to choose "Native" anyway. And you also must use SPICE protocol only to use USB devices, VNC protocol does not support any access to USB devices, attached to the host system.
- We did not check an ability to use any USB 3.0 devices. We do not have an appropriate hardware on our DCs.
In this example we use simple 8GB FAT32 USB flash drive, which is mounted on host system in /mnt
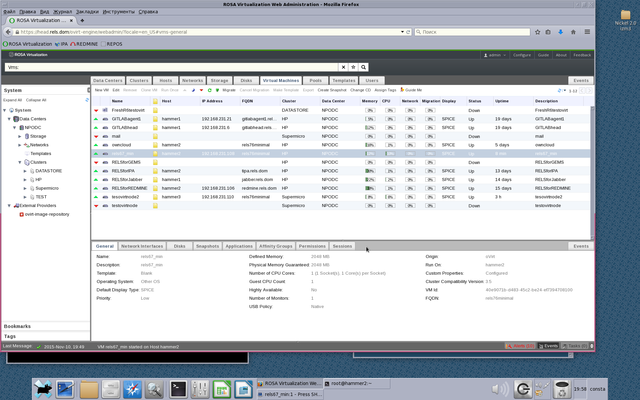
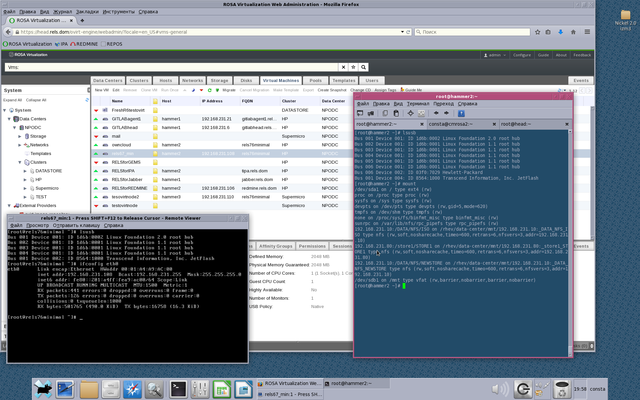
Our host system is named "hammer2" (See on Picture 2).
VM which we use the USB device for, is named rels67_min (ip — 192.168.231.108, FQDN — rels76minimal).
At last, our HOWTO (you must be root or use sudo to grant access):
- 1. Attach your USB device to your host system in DC (in our case we use "hammer2")
- 2. Install on your host system (in our case on "hammer2"), and install on your host running oVirt-engine (in our case we use host "head") the package vdsm-hook-hostusb:
yum install vdsm-hook-hostusb
- 3. On your oVirt-engine host run:
engine-config -s UserDefinedVMProperties='hostusb=[\w:&]+'
After your oVirt-engine will ask you to point appropriate oVirt version.
In our case we choose 3.5 (press 6 on keyboard).
- 4. Run on oVirt-engine host (on host "head"):
/etc/init.d/ovirt-engine restart
- 5. Run on host system (run on host "hammer2", where USB device has been attached):
/etc/init.d/vdsmd restart
- 6. Check USB device on host system:
lsusb
(if you can not run lsusb install usbutils package: yum install usbutils)
In our example we see our USB device as:
Bus 001 Device 004: ID 8564:1000 Transcend Information, Inc. JetFlash
Look at Picture 1.
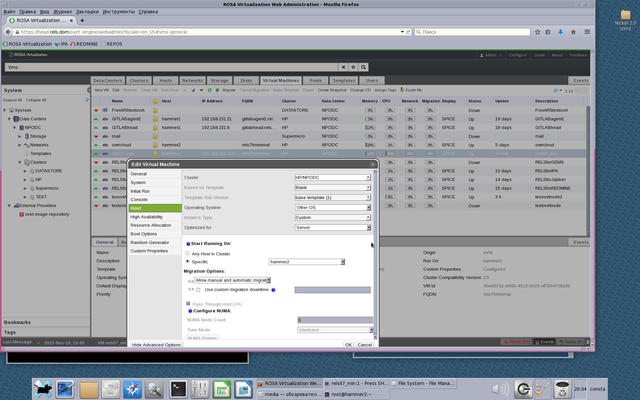
- 7. Open VM properties (right mouse click and choose Edit in menu). Virtual machine must be powered off, when you edit its properties.
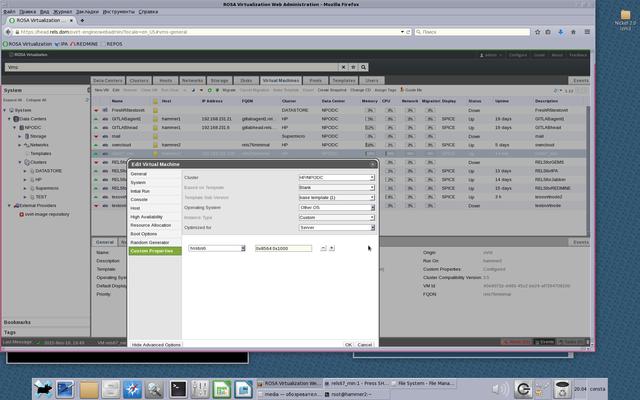
Attach your VM to specific host (see on Picture 3, we choose host "hammer2"), where your USB device is.
- 8. In Custom Properties menu a new option Please select a key appears.
Choose hostusb and write USB device ID, but do not forget to write prefix 0x. So in our case we write 0x8564:0x1000
See on Picture 4
- 9. Run your VM as usual, use SSH, VNC, SPICE, etc, to check USB device status:
lsusb
Look at Picture 1.
Now you can mount your USB device inside your VM.
Checking ROSA Desktop ISO Consistency By Means Of Checkisomd5
According to our not-so-secure information, in order to install ROSA most users download ISO images from our sites and then either install from this ISO directly or burn it to a USB flash or DVD disk (yes, it looks like DVD devices are still in use nowadays). Unfortunately, despite the common tendency of improving Internet speed and quality, it can still happen that something goes wrong during image download and user gets a broken file. Installation from such a file will be likely unsuccessful, so it is a good idea to preliminary check ISO file correctness.
A traditional way of verifying file content is to calculate its hash some and compare it to the expected value which is usually placed in a separate file (with .md5 or .sha1 or some other extension, depending on algorithm used to calculate the sum) near the ISO image. So besides the ISO file itself, you should download a file with its hash sum, calculate hash of the downloaded ISO (by running md5sum ROSA.iso) and compare the result with the expected one. Some programs will do some of these tasks for you automatically - e.g., K3b used to burn ISO images can automatically calculate hash sum of the image and compare it with the one provided in .md5 file (if the latter is found near the ISO file).
A less known way to verify ISO image content is to embed its hash sum into the file itself. The thing is that ISO9660 files contain an unused section whose size is large enough to store MD5 sum. To calculate MD5 sum of the ISO image content and embed it in the file itself, one can use implantisomd5 tool which is a part of isomd5sum package. To verify the image content (calculate its sum and compare it with the embedded value) one can use checkisomd5 tool from the same package.
All modern ROSA Desktop Fresh images contain MD5 sum embedded by means of implantsiomd5, so to verify downloaded ISO image you can simply launch
$ checkisomd5 ROSA.iso
This command has a couple of additional options: "--verbose" will provide you with additional inmformation about verification process, "--gauge" will display progress by means of numbers from 0 to 100 and "--md5sumonly" will force the tool to calculate and print hash sum of the ISO content, but not to compare it with embedded value.
You can launch checkisomd5 not only against ISO files, but also against block devices - for example, if you have a DVD with ROSA in your DVD drive, you can verify its content by means of checkisomd5 /dev/dvdrw.
Please not forget to verify downloaded images. This doesn't take long and can save you a lot of time in future if you try to install a system from a broken image.
Maintaining URLs In RPM Metadata
As you likely know, all programs in ROSA Linux are distributed as RPM packages that include application files themselves (binary executables, libraries, data, etc.) and so called metadata - package name, summary, description, requirements and so on. In this paper, we will speak about metadata fileds that can contain URLs to some external Internet resources.
First of all, this includes the URL field which points to a program home page (which you can see among other information in package manager). Besides that, many package spec files (that contain instructions for rpmbuild on building packages from the source code) specifies location of the source code in the Internet:
Source0: http://my-app.org/downloads/my-app-1.0.tar.gz
What is the need to specify URL here? I guess that the original reason was to simplify maintainers life and to help him find source code of a new program version in the Internet (sometimes it is not enough to know application home page, you can spend some time browsing that page and looking for the sources). Given the source URL, you can just replace my-app-1.0.tar.gz with my-app-2.0.tar.gz and any downloader will bring you a new upstream version. Long time ago you had to do this manually, but nowadays rpmbuild in ROSA Desktop can download files from Internet by itself, so all you should do to build a new version is to update Version field in the spec file (given that version macro is used instead of hardcoded value wherever appropriate).
One more ROSA tool utilizing URLs to source code archives is Updates Tracker. It analyzes source URLs from the spec files and decides where to look for a new upstream tarballs.
Thus, URLs in package metadata are quite useful and actively used. But as any other Internet resources, from time to time they can disappear or change their location. Package maintainers should detect such situations and update metadata correspondingly, otherwise users will go to dead pages instead of application home sites and Updates Tracker will look for new application versions in those places where these will versions will never appear.
For popular packages actively maintained by ROSA developers and community, the metadata is usually updated manually. However, we have quite a few package in Contrib repository which are updated rarely or used by so few people that no maintainer pay much attention to them. In addition, one should remember that manual metadata update can suffer from common issues which arise when human being performs some routine task - one can make a typo, use a wrong URL or just forget to update the data due to laziness or lack of time.
To solve this problem, it is necessary to automate routine tasks. URL monitoring is definitely a good candidate for automation. For RPM packaging and maintenance, we don't need complex Web crawlers and tracker, but instead we need a specialized tool that would analyze our spec files, find dead URLs and try to look for replacements.
This year we decided that development of such a tool is a good task for students of Russian Higher School of Economics during two week they spend in ROSA as a part of their practical work. As a result, we got two scripts - one to analyze spec files and detect broken URLs and another to find replacements for them.
The first one named find_dead_links acts in a straightforward way - it analyzes given set of spec files, extracts all URLs from them and checks availability of every resources. A set of potentially dead URLs is dumped as an output.
The second script named URLFixer analyzes output of find_dead_links and tries to find new location of every resource. Currently it can't detect new location of application home pages (though with current Web search technologies this doesn't seem to be impossible even for machines), but can successfully detect new location of source tarballs. As our investigations showed, most dead URLs appear due to trivial reasons - upstream developers can remove old tarballs from their site (in this case we have a good sign for package maintainers to update the package) or repack tarball to another format (e.g., in the latest years it became popular to switch to XZ compression). The tool checks if one of such cases happened with tarball under analysis and tries to determine the new URL if this is the case.
To be sure, these scripts are not complex at all (so it wasn't hard for a couple of students without Linux programming experience to develop them in two weeks), but when run against ROSA Desktop Fresh repositories these tools produced wonderful results. It turned out that 500 of our packages contained broken URLs and about 80% of them were quickly fixed with the help of URLFixer.
ROSA hardware DB — the largest in the world
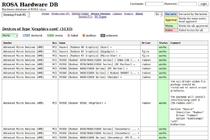
A month ago we asked the community to actively make probes of their computers to replenish our hardware database in order to beat the market leaders, such as Ubuntu and openSUSE. A huge number of ROSA users responded and now we have the largest database of supported hardware in the world! We can say that it is the most technological hardware database in Linux, because it contains much more information about the devices and computers than other databases and it is replenished automatically by the hardware probe tool.
On August 25 2015, the size of the largest hardware databases is the following:
| Base | Size |
|---|---|
| ROSA | 1515 |
| Ubuntu | 1105 |
| openSUSE | 946 |
| h-node | 533 |
| Debian | 226 |
The ROSA hardware database includes 1515 tested computers, in almost one and a half times more than the database of the nearest competitor — Ubuntu. The database includes 768 mobile computers (notebooks and tablets), 728 desktop computers and 18 servers. The oldest tested computer is the Acer TravelMate 420 2002 model year with Pentium 4 (a8af42d6e7). The "biggest" one is the HP Superdome2 with 15 core Xeon E7-2890 and 2TB of RAM (9036136416). We have tested 1372 videocards, 332 WiFi cards and thousands of other devices.
The presence of such a large database of supported hardware allows to faster and systematically debug and fix problems with individual devices on users' computers, as well as choose to buy only tested models of computers and devices.
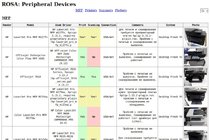
Database of multifunctional devices.
RaceHound 1.0 - Once More about the Races in the Kernel
Version 1.0 of RaceHound system has been released recently. RaceHound, as its name implies allows to detect the so called data races in the Linux kernel.
To put it simple, «data race» is a situation when two or more threads of execution (in an application, in the kernel, etc.) may access the same data in memory concurrently and at least one of the threads changes these data. Such conditions may lead to very unpleasant consequences but are often quite hard to detect.
The tools like KernelStrider may help reveal the races. They usually find a lot of potentials but may produce false alarms too. That is, they may report a potential race when a race is not possible.
On the other hand, RaceHound may miss something but if it has detected a race, the race does happen. By the way, these tools work together very well: KernelStrider finds potential races while RaceHound checks if these races really happen.
This was used not long ago to detect an interesting race in «uvcvideo» driver (webcam support) in the kernel 4.1-rc5. The developers of the driver, however, suggest that nothing bad should happen because of that race, but still.
The ideas implemented in RaceHound are rather simple.
- Place software breakpoints (similar to what the debuggers do) on the instructions that may be involved in the races.
- When a software breakpoint hits, determine the address and the size of the memory area the instruction is about to access.
- Place hardware breakpoints on that memory area to detect appropriate accesses to it.
- Make a delay. If some code tries to access to that memory area during the delay, the hardware breakpoints will trigger and the race will be revealed.
- Remove the hardware breakpoints and let the original instruction execute as usual.
As it is often the case, the devil is in the details. Implementing that algorithm was far from easy. It is no surprise that RaceHound is being developed since the summer of 2012.
Compared to the previous versions (0.x), our specialists overhauled the core components of RaceHound in version 1.0. It was only possible before to analyze one kernel module at a time, with additional restrictions. Now RaceHound is able to monitor the code from several modules and the kernel proper at the same time, any code a software breakpoint can be placed to.
Besides, during the development of RaceHound 1.0, an error in the implementation of the software breakpoints (so called, Kprobes, to be exact) was found and fixed in the kernel. The fix should appear in the kernel 4.1.
ROSA Enterprise Desktop X2
ROSA company is glad to announce ROSA Enterprise Desktop X2 — new version of operating system for enterprise use. The distribution includes software for all common tasks: office suite, Internet browser, E-mail and IM clients, audio and video viewers and editors and a lot of other programs. The distribution is based on ROSA Desktop Fresh KDE but provides additional stability guarantees — all updates except fixes for crucial bugs and security holes are published to RED repositories only after careful testing by QA team and users of ROSA Desktop Fresh.
If you would like to buy this distribution or get ISO image for internal tests, please contact ROSA sales department. See our site for details.
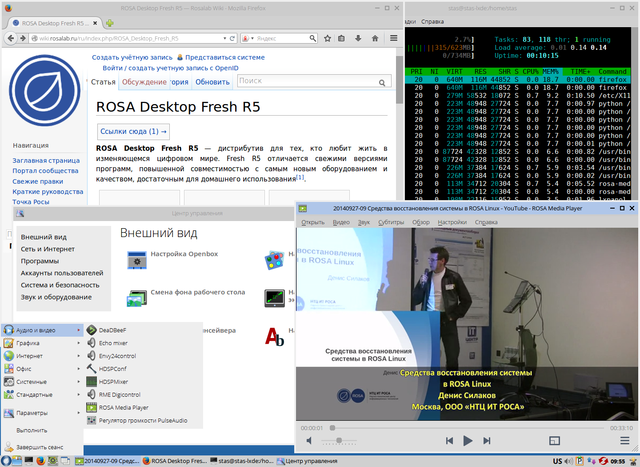
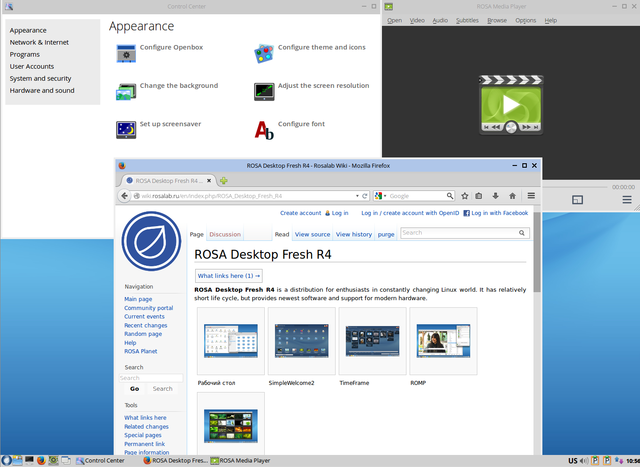
ROSA Fresh Desktop R5 LXDE
As many English-speaking users already noticed, more than a month ago we have published ROSA Desktop Fresh R5 LXDE images on our mirrors but still didn't make the announcement. We are extremely sorry for this delay and now would like to provide you some details about that release.
- Foreword
LXDE, that is Lightweight X11 Desktop Environment is one of the most popular lightweight desktop environments.
In the world of user interfaces lightweight implies
- Instant reaction of GUI applications to user actions and low resource consumption. One of the way to teach this is to drop all potentially slow components such as interpreted languages with dynamic garbage collectors and use compiled programs only (at least in the core system part) and use the same set of shared libraries for all core components - window manager, control center, file manager, taskbar and other desktop items. The latter usually means that all programs with GUI should be implemented using the same GUI toolkit - Qt, Gtk or other. And it would be better if all programs in the system use this toolkit.
- Simplicity of UI concept. To be sure, we have the simplest desktops such as twm or fvmm, but most users would prefer more intuitive desktops that look similar to Windows 95/XP with the task bar at the bottom and the "Start" button at its left side.
If you like the ideas above, then you should definitely try LXDE which tries to implement this lightweight concept:
- It uses a light window manager named OpenBox which misses modern 3D effects but is able to work on almost any video card.
- Its UI concept is similar to the one of Windows 95/XP and is comfortable for users who don't want to become familiar with modern designs such as Gnome3 or MacOS X and at the same time don't want to spend much time on reconfiguring desktop according to their wishes (like it often happens with KDE which can be made to look similar to old-style Windows, but this definitely requires some efforts).
Besides the user interface, one should remember that LXDE doesn't consume much resources so you can install it on your old granny's notebook and still launch Chromium or ROSA Media Player there.
- Download
The LXDE R5 images can be downloaded here:
- System Requirements
- 256 Mb of RAM (512 Mb is recommended for the installed system and 384 Mb for the Live mode).
- 6 Gb of free space at your hard drive
- At least Pentium4/Celeron CPU
- Release Notes
LXDE edition shares the package base with KDE and Gnome, so improvements in one flavor automatically appears in the others (if applicable).
In comparison with the previous release, the following changes appeared in ROSA Desktop Fresh R5:
- Boot loader and installer now supports Secure Boot and have a lot of other improvements to support modern hardware.
- Updated versions of major system components (Linux kernel, Mesa and X11 stack, NVidia and AMD proprietary drivers) as well as user-level software (new Chromium, Thundebird, Firefox and others).
- Automated launch of TRIM for SSD (once a week), implemented by means of ssd-utils package.
- Improved support for Intel+AMD hybrid graphics - just set it up by means of our XFdrake tool.
As for LXDE-specific improvements, one can mention only a couple of bug fixes:
- Fixed work of battery indicator on laptops.
- Fixed work of playing files with non-ASCII symbols in ROSA Media Player.
- Updating From Previous Releases
If you already have ROSA Fresh LXDE R4 installed then you have nothing to worry about - your system will be automatically updated to R5 state (and even further) by means of standard update mechanism. Users of older systems (R1, R2, R3) should first update their systems to R4 (though we recommend new installation wherever possible).
- Feedback
Feel free to try and provide your feedback. We have official forum monitored not only by isers but also by ROSA developers and QA team and classic bugzilla for advanced users who are able to formulate their problem in the terms that developers will easily understand. You can use this link to file a new bug against LXDE edition.
- Future Directions
The ROSA Desktop Fresh LXDE R5 is based on the rosa2014.1 with guaranteed support until the 2016, Autumn. However, before that date we are planning to switch to LXQt as our main lightweight desktop environment. LXQt appeared as a united project of LXDE and RazorQT teams who decided to rewrite all LXDE in Qt.
LXQt is already available in ROSA repositories and you can try it by installing task-lxqt package.
There are still a lot of things to do here, but the current quality is already close to LXDE
Basic GUI for ROSA Freeze
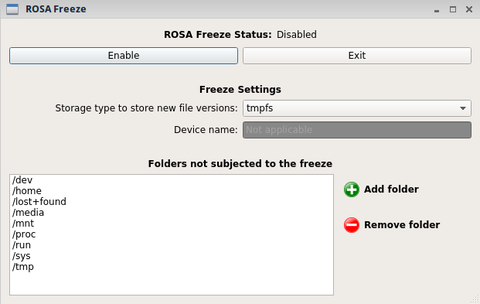
One of the new features in last ROSA Desktop Fresh releases was ROSA Freeze tool which allows you to "freeze" your system so that all (or almost all:)) modifications performed during the session are automatically rolled back after reboot. The tool is very easy to use but works from command line only. Many users are afraid of such tools and finally it is hard to find them in the system. To facilitate use of ROSA Freeze, we have developed a basic GUI application able to turn the freeze "on" and "off". The GUI tool doesn't have a special name, just look for the rosa-freeze-ui package. In command line one can use a shorter alias — urpmi rfreeze-ui. After this, you should be able to find "ROSA Freeze" in SimpleWelcome menu or just launch rfreeze-ui from the command line.
Besides turning the freeze on and off, GUI allows specifying different freeze parameters — what should be used to store modified versions of files and which folders should not be subjected to the freeze (remember that freeze of /home folder and folders located on a non-root partitions is not supported).
We hope that this simple GUI will make the use of ROSA Freeze easier. But be careful and don't forget that you have enabled the freeze (or don't be surprised if you loose all your changes after reboot). And if your system suddenly reports that no more space is left on your root partition (while you are sure that you have utilized only small part of it), check if you have the fereze turned on with tmpfs used as a storage for modified files.
As usual, you can find the source code of the new tool in ABF, suggestions, feedback and patches are welcome.
ROSA Cloud Connector - Easy Way To Connect The Cloud!
As some of you know, from time to time students from the Russian Higher School of Economics participate in ROSA development as a part of their studies. Usually the students perform different tasks concerning package maintenance and develop auxiliary tools (sometimes very useful, like this one).
Besides such simple tasks, the students perform more serious developments. Often we ask them to create some useful infrastructure programs which are not visible by ROSA users. However, this year we've got an exception - a tool named "ROSA Cloud Connector".
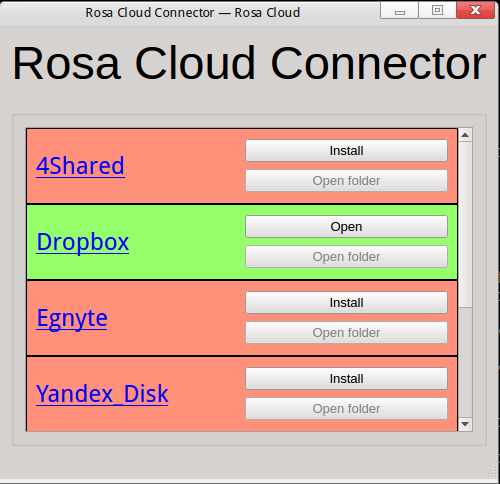
The tool behaves exactly like it name states and connects your machine to different cloud storage services. The connection can be performed only if the target service supports Linux. If there is a native client (like in case of Dropbox), it will be automatically installed. If there is no client but the service supports WebDAV, then this protocol will be used to mount your remote storage to the local system, so you will see your files in Dolphin, Nautilus and other file managers. You should only provide the program with your cloud service account details (login and password) and it will perform all necessary actions automatically - no need to download and install client or investigate WebDAV mounting instructions by yourself.
To get the tool in your system, you should install the rosa-cloud-connector package. Please make sure that all other packages in your system are up to date )especially those that contain "qt5" in their names). Then look for the rosa-cloud in the menu or just launch it from the command line.
The list of cloud storage services with Linux support is not huge. Moreover, it can become shorter over time - while we were working on the tool, two of the services known to us became dead. Though it is possible that we simply don't know that some other services exist - make us know if you are aware of such products and we will add their support to ROSA Cloud Connector. And it is possible that other Linux users will know new services after they meet them in our tool!
The current version of ROSA Cloud Connector is far from ideal (remember that it is the first Linux development experience for its authors). But if users express interest in it, we are ready to improve the tool.
As usual, everybody is welcome to provide not only feedback, but patches. The source code is available in ABF. Feel free to fork it, investigate and send pull requests!
ssd-utils - Weekly TRIM for SSDs
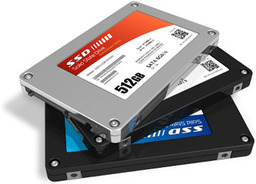
It is well-known that the low-level operation of solid-state drives (SSD) differs a lot from that of HDDs.
If the file system supports it, it can be beneficial to tell the SSD from time to time which blocks of data are no longer in use (deleted files, etc.). At least, this allows to avoid the performance degradation.
TRIM operation is provided exactly for that purpose and it can be used with the most of the modern SSDs. The file systems commonly used in Linux, like ext4, btrfs, xfs and some others, already support TRIM.
There are two main ways to get TRIM done:
- Perform TRIM each time a file is deleted. For example, this can be enabled for ext4 if the file system is mounted with discard option. Usually, it is not very convenient. TRIM takes time and, if it is done often, the file operations on this SSD may even become slower, negating the performance gain.
- Run fstrim command from time to time. TRIM will be performed for all data blocks that are no longer in use by the file system.
Ubuntu chose the second way starting from version 14.04. Now we have it in ROSA Fresh R4 too — just install ssd-utils package and that is it.
ssd-utils will perform fstrim right after the installation (for the file systems that support it) and will arrange for fstrim to run once a week automatically.
It is worth mentioning that the systems with encrypted volumes, RAID, devmapper-based volumes and the like may require some manual steps to make sure TRIM requests from the file system actually get to the underlying SSD.
Besides, similar to what Ubuntu does, fstrim will run only on the SSDs by the «reliable» vendors by default. At the moment, these vendors are:
- Intel
- Samsung
- OCZ
- SanDisk
- Patriot
There were problems with SSDs by some other vendors that caused file system corruption. Still, if you have an SSD by a vendor not listed above and believe the SSD is OK, you can enable fstrim for it too. To do that, just add --no-model-check option to fstrim-all in /etc/cron.weekly/fstrim.cron (see the comments in that file for details).
ROSA Desktop Fresh R4 LXDE
ROSA is happy to announce the release of LXDE edition of ROSA Desktop Fresh R4 distribution targeted to weak machines for which KDE or Gnome3 are too heavy. This release was highly requested by ROSA users and was prepared with the help of our community.
The distribution can be downloaded here:
Minimal system requirements:
- 256 Mb of RAM (recommended value is 512 Mb for the installed system, 384 Mb for the Live mode).
- Free hard drive space: 6 Gb
- CPU: Pentium4/Celeron
The core system components include:
- LTS kernel 3.14.15 with BFQ version 7r5
- Glibc 2.19
- GCC 4.9.2_2014.08 Linaro
- Graphical subsystem based on Xorg 1.15 and Mesa 10.2.7
- XFdrake tool for configuring graphical subsystem with improved support for hybrid Nvidia+Intel graphics.
- Latest versions of LXDE components based on thes Gtk stack
- Due to the lack of native tools for power management and notifications, appropriate components from XFCE are used which have been adapted to work with systemd.
The ISO image includes the following applications:
- LibreOffice Writer and Calc 4.3.2
- Firefox 32.0.2
- ROSA Media Player as a default media player
- Claws-mail mail client
Thus, for most users the distribution is ready to use out of the box. But even if some software is missing, users can install it from ROSA Desktop Fresh R4 repositories.
This is likely the last release of ROSA Desktop Fresh based on LXDE. In future we are going to use LXQt as a lightweight desktop environment. LXQt packages are already available in our repositories, so feel free to try them.
Urpmi - Automatically Add Media When Installing Remote Packages
ABF build system provides a convenient way to build experimental packages and share them with other users for test purposes without publishing them to any repositories — in order to do this, you can build a package and create a container from build list. Container is an ordinary repository which contains only packages from your build. So users can add your container as a repository and install packages from it.
However, containers are used as a temporary storage to tests packages before rejecting them or publishing to official repositories (and moreover, containers are automatically destroyed by ABF after two months from their creation). A typical scenario for users who would like to install packages from container is to add container as a repository, install packages and remove that repository. Too many actions! If you have only one package in container, you can simply provide urpmi with a link to that package, but this won’t work if you have several packages that depend on each other. No wonder that we got several requests to improve urpmi a little when dealing with remote files — urpmi should not only download a file, but try to add remote media (if possible) before installing the package, and remove this media after installation is finished
For example, if you want to install apache-mpm-prefork from build https://abf.io/build_lists/2290444. With previous urpmi, you couldn’t install it without adding container as a medium:
[root@r4null64 ~]# urpmi http://abf-downloads.rosalinux.ru/rosa2014.1/container/2290445/x86_64/main/release/apache-mpm-prefork-2.4.10-2-rosa2014.1.x86_64.rpm
The following packages cannot be installed:
apache-mpm-prefork-2.4.10-2-rosa2014.1.x86_64 (due to unsatisfied apache-base[== 2.4.10-2])
To be sure, apache-base-2.4.10-2 is located at the same container.
With the new urpmi, this command works like a charm:
urpmi http://abf-downloads.rosalinux.ru/rosa2014.1/container/2290445/x86_64/main/release/apache-mpm-prefork-2.4.10-2-rosa2014.1.x86_64.rpm
removing medium "medium_for_apache-mpm-prefork-2.4.10-2-rosa2014.1.x86_64.rpm"
adding medium "medium_for_apache-mpm-prefork-2.4.10-2-rosa2014.1.x86_64.rpm"
    http://abf-downloads.rosalinux.ru/rosa2014.1/container/2290445/x86_64/main/release/media_info/20141009-184429-synthesis.hdlist.cz
    http://abf-downloads.rosalinux.ru/rosa2014.1/container/2290445/x86_64/main/release/media_info/20141009-184429-info.xml.lzma
    http://abf-downloads.rosalinux.ru/rosa2014.1/container/2290445/x86_64/main/release/media_info/20141009-184429-files.xml.lzma
    http://abf-downloads.rosalinux.ru/rosa2014.1/container/2290445/x86_64/main/release/media_info/20141009-184429-changelog.xml.lzma
To satisfy dependencies, the following packages are going to be installed:
(test only, installation will not be actually done)
 Package                        Version      Release       Dist  DEpoch Arch
(medium "medium_for_apache-mpm-prefork-2.4.10-2-rosa2014.1.x86_64.rpm")
 apache-base                    2.4.10       2             rosa  2014.1 x86_64
 apache-mod_actions             2.4.10       2             rosa  2014.1 x86_64
 apache-mod_alias               2.4.10       2             rosa  2014.1 x86_64

 < ... cut list of packages from container to be installed ... >

 apache-mod_auth_basic          2.4.10       2             rosa  2014.1 x86_64
 apache-mod_usertrack           2.4.10       2             rosa  2014.1 x86_64
 apache-mod_version             2.4.10       2             rosa  2014.1 x86_64
 apache-mod_vhost_alias         2.4.10       2             rosa  2014.1 x86_64
 apache-modules                 2.4.10       2             rosa  2014.1 x86_64
(command line)
 apache-mpm-prefork             2.4.10       2             rosa  2014.1 x86_64
8.1KB of additional disk space will be used.
887KB of packages will be retrieved.
Proceed with the installation of the 38 packages? (Y/n) Y

< ... cut off installation log ... >

removing medium "medium_for_apache-mpm-prefork-2.4.10-2-rosa2014.1.x86_64.rpm"
As we can see, urpmi has added a medium named medium_for_apache-mpm-prefork-2.4.10-2-rosa2014.1.x86_64.rpm in the beginning and removed it in the end. Even if package installation fails (due to file conflicts, unresolved dependencies or if you answer «no» when urpmi suggests to install additional packages), the medium will be removed. But if you interrupt installation process (e.g., by pressing Ctrl-C), then medium will be left in the system.
URL of the medium to be added is obtained in a very straightforward way — we simply drop package name from the URL passed as urpmi argument. If urpmi fails to add such a media, you will get a corresponding message, but the installation of remote package will proceed. Finally, you can disable this behavior completely by using --no-auto-media option in command line or no-auto-media global option in /etc/urpmi/urpmi.cfg.
ROSA Hardware DB
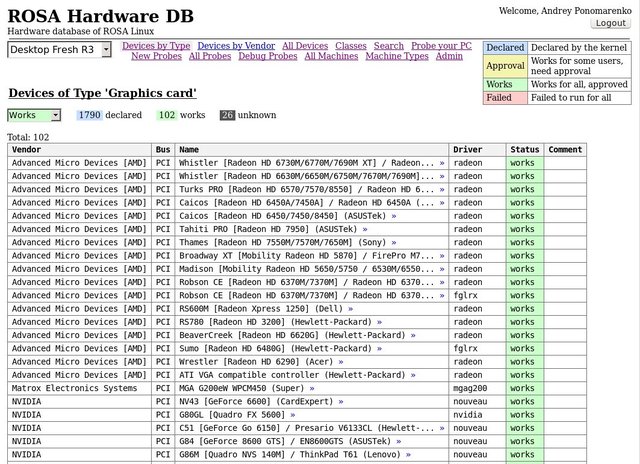
The database is now available at Linux-Hardware.org.
Today the market offers a huge variety of configurations of personal computers. In the development of the ROSA operating system we make considerable efforts to support all possible configurations.
Five years ago, when developing first versions of the operating system and, until recently, we used the industry-standard method of user interaction. If the user encountered some problem, then he reported about it on our forum or bugzilla. The support team then began to ask the user to submit characteristics of the computer, system logs, etc. All these numerous data were collected in comments to the appropriate bug in bugzilla and then analyzed by the developers. The main disadvantage of this approach was that the user was required to perform too much actions, so the debugging of the problem stretched into weeks, and sometimes months.
To simplify the process of interaction with users, we have developed the HW Probe Tool. The tool is designed to collect all the necessary information on the user's computer to analyze and debug his problem. In this case, the user is required to perform only one command:
hw-probe -all -upload
One can run this command on the installed system or in the Live-mode. It is highly recommended to run this command as root in order to upload more details about all devices installed on the computer. And it's desirable to connect the maximum number of peripheral devices available to analyse them too.
As a result of this command, information about all hardware devices on the computer, the system initialization logs and other information will be uploaded to our database for subsequent analysis by developers and support team. User in this case will receive a link to the probe of his computer, that can be attached to the message on the forum, bug or shared with knowledgeable people who can help to fix the problem (the probe example for ASUS N73SV is here). As a result of this interaction mechanism, problems on users' computers are now analyzed and solved much faster.
The hw-probe package is already included in ROSA Desktop Fresh R4. Please update the package before using it in order to upload most complete test results to the database. Users of other versions of the ROSA operating system must install the package from this directory.
The database is available at hw.rosalinux.ru/.
On the basis of all the collected probes, as well as static analysis of the kernel drivers, we automatically create the database of supported hardware. You can find the DB on the website hw.rosalinux.ru/. You can, for example, look at the list of all tested graphics cards or the list of all WiFi-cards, support for which is declared in the kernel. You can also view the list and the classes of all tested PC models. For the classification of devices we use kernel classification of appropriate device drivers. For PCI and USB devices additionally we use thin classification by the class id of the device.
In this note, we invite all users of the ROSA operating system to upload probes of their computers in order to participate in creation of the ROSA Hardware DB. If some device does not work, please also post a message about it to our forum or bugzilla.
ROSA Desktop Fresh R4 Is Out!
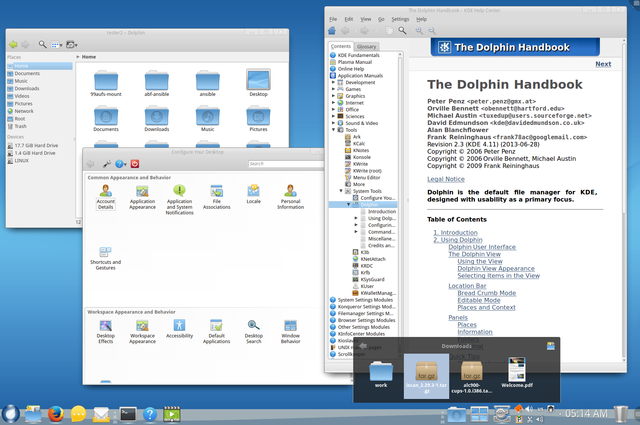
The ROSA company is happy to present the long waited ROSA Desktop Fresh R4, the number 4 in the "R" lineup of the free ROSA distros with the KDE desktop as a main graphical environment. The distro presents a vast collection of games and emulators and the Steam platform package along with standard suite of audio and video communications software including the newest version of Skype. All modern video formats are supported. The distribution includes the fresh LibreOffice v4.3.1, the full TeX suite for true nerds as well along with best Linux desktop publishing, text editing and polygraphy WYSISYG software. The LAMP/C++/… enviroment packages are waiting to be installed by true hackers.
The R4 distribution is recommended for both the home users who want to communicate and surf the web and for the experienced ones who'd like to tweak the system their own way. ROSA Fresh R4 is based on a new rosa2014.1 platform which will be supported for 2 years and will serve as a base for several future releases.
Unlike R1, R2 and R3 releases, this release uses different repositories based on a new rosa2014.1 platform. All users of previous ROSA Desktop Fresh releases are highly encouraged to migrate to R4 release, since old releases are no longer supported. We recommend to install R4 over existing system from ISO image (if you have a separate /home partition, you can reuse it to save all your data), but it is also possible to update existing systems without re-installation.
Automated Metadata Updates in Urpmi
Maintainers who constantly deal with development branch of ROSA often meet a problem with outdated metadata when trying to install a package using urpmi - it often happens that a newer version of the pakcage has been already built and published, but the local metadata still contains only information about old version of the package which is now missing. If this is the case, one have to launch urpmi.update and try to install necessary package again. To be sure, one can simply launch urpmi --auto-update, but execution of this command can take significant time and usualyl maintainers don't want to wait for it.
A good news is that in rosa2014.1 development branch (which should become ROSA Desktop Fresh R4 soon) we have improved urpmi to automatiaclly update metadata and relaunch itself in case when something goes wrong with package download and it is likely that metadata update will help. This behavior is the default one in rosa2014.1, though one can disable it by means of «--no-restart» option. Note that to avoid looping, in any case the metadata will be updated only once - if this doesn't help, then urpmi will fail as before. In addition, you can specify a timeout for urpmi to wait until trying to update metadata. This option will be useful for ABF, since sometimes package builds fail due to the reason that old version of some package has been already dropped from repositories, while metadata for the new version hasn't been generated yet. When ABF will adopt a new urpmi, the number of such failures should decrease.
The new urpmi feature is primarily useful for maintainers. Most of ordinary users rarely meet such kind of problem, at least while they have automated updates enabled - the thing is that in order to perform automatic updates, urpmi.update is launch automatically on a regular basis, and updates in repositories of the released systems doesn't happen as often as in development branches. Though users are very different, so it is likely that some of them will notice that the number of routine actions necessary to update a package has decreased a little.
So, enjoy and be ready for the next ROSA release!
Spec-gen - Automated Spec File Generator for GNU Autotools and CMake-based Programs
Similar to many other distributions, ROSA pays a lot of attention to automation of different maintainers tasks and tries low the «entry barrier» for newbies. One of the problems faced by almost every newbie who wants to build some application for ROSA is creation of spec file to build an RPM package for our distribution. In many cases spec file can be generated automatically — for example, we have corresponding tools for modules of Python, Perl, Ruby, etc.
However, many programs for Linux are developed using comiled languages such as C/C++ and are built using GNU Autotools, CMake and analogues. Up to now, for such programs we only provided spec file templates and recommendations in Packaging Policies. This is normally enough for experienced maintainers, but newbies often experience difficulties with the very first step of spec file development. That’s why we have developed a new tool named spec-gen which is able to automatically generate spec file template on the basis of analysis of tarball with application source code.
The tool is very easy to use — just install spec-gen package in your ROSA installation and launch spec-gen with tarball name as an argument:
$ spec-gen my_tarball-1.0.tar.gz
By mean of -g, -s, -l and -u options you can specify group, summary, license and URL of the package to be created. You can omit these options and populate corresponding fields with data after the spec file is created. The tool try to guess package name and version on the basis of archive name — the guess is that most archives with source code are named in the «<program_name>-<version>» fashion. The tool supports all popular archive formats, but if you need to add support for more formats — feel free to send us a request.
During its work, the tool will look through archive content and check if it contains configure.in, configure.ac, CMakeLists.txt, *.cmake or setup.py files. If the latter file is found then the tool will simply launch python setup.py bdist_rpm5 command and provide your with a spec file created by it. In case when GNU Autotools or CMake files are detected, spec-gen will analyze them and detect which ROSA packages should be installed to build your application — that is, the tool will try to automatically create a list of Buildrequires for your new package.
We recommend to launch spec-gen in the system for which you want to build a package, since it uses information from system repositories about package provides and files by means of urpmq and urpmf programs.
As a result, spec-gen will provide your with a spec file with filled header, list of BuildRequires, %prep, %build and %install sections. Adjustment of the list of files in the %files section, splitting the package to subpackages and other complex tricks should be performed manually. To be sure, one can’t guarantee that generated BuildRequires list is completely correct — it is possible that some dependencies are not mentioned explicitly in build scripts or spec-gen makes a wrong choice among several alternatives. Nevertheless, in most cases the tool works correctly and provides you with a spec file that ca be used to build a package. It is likely that hte only task left to you is adjustment of the %files section.
It is possible that in future we will implement even more automation — for example, we can try to automatically build a package using generated spec file and then automatically adjust the %files section on the basis of build results. Actually there are a lot of possible improvements in this area, and everybody is welcome to provide su with feedback, share ideas and send patches. The source code is available here — https://abf.io/soft/spec-gen-dev.
Finally we are glad to note that the basis of the spec-gen tool was developed by Andrey Soloviev, a student of Higher School of Economics, during his practice in ROSA Company.
Boot and Install ROSA from your own HDD
There are many ways to install ROSA — for example, you can use ISO image located at your hard drive. However, a trick with ISO described in our wiki requires some full-functional operating system to be installed in your machine to perform some preliminary actions. However it can happen that your system is broken and neither you can boot from external device. Our colleague Sergey Sokolov recently met such a problem, and below he describes a solution that helped him to bring his system back to life.
Since I am one of ROSA developers, it is no wonder that I have installed a development release of ROSA Fresh R4 to my notebook (at the time when we even didn’t have an Alpha release). Once a day I decided to update my system to the current state of repositories. Unfortunately, it turned out that exactly at that moment a lot of system stuff updates (systemd, glibc, etc.) were ongoing. And I was so unlucky that my system refused to boot after update.
It would be nice to launch Live CD or just reinstall the system, but my machine didn’t have CD/DVD recorder, I didn’t have a boot USB flash and there was nobody near me to prepare such a boot device for me! However, I remembered that I had an ISO image of ROSA on my HDD.
I took a look at my partition table:
# fdisk -l /dev/sda

Disk /dev/sda: 480.1 GB, 480103981056 bytes, 937703088 sectors
Units = sectors of 1 * 512 = 512 bytes
Sector size (logical/physical): 512 bytes / 512 bytes
I/O size (minimum/optimal): 512 bytes / 512 bytes
Disk identifier: 0x00000000

Device Boot     Start       End       Blocks   Id  System
/dev/sda1            2048    33556479    16777216   82  Linux swap / Solaris
/dev/sda2        33556480    96471039    31457280   83  Linux
/dev/sda3        96471040   937703087   420616024    5  Extended
/dev/sda5        96473088   937703087   420615000   83  Linux
Here /dev/sda1 was a swap which I didn’t use anymore, /dev/sda2 was my root and /dev/sda5 was a /home.
The system failed to boot normally, but I still had initrd loaded and dracut console. And that turned out to be enough to do the following actions:
mkdir /mnt
mount /dev/sad2 /mnt
mount -o bind /dev /mnt/dev
mount -o bind /dev/pts /mnt/dev/pts
mount -o bind /proc /mnt/proc
mount -o bind /sys /mnt/sys
mount /dev/sda5 /mnt/home
chroot /mnt
dd if=/home/path/to/ROSA.FRESH.KDE.R3.x86_64.iso of=/dev/sda1 bs=8M
touch /boot/resque.iso
vi /boot/grub2/grub.cfg
In grub.cfg, I found rescue.iso item and edited it as follows:
### BEGIN /etc/grub.d/43_resque ###
if [ -f  /boot/resque.iso -o -f /boot/sgb.iso ]; then
submenu 'Repair tools' {
if [ -f  /boot/resque.iso ]; then
menuentry "Boot rescue CD" {
linux (hd0,1)/isolinux/vmlinuz0 boot=live iso_filename=/dev/sda1 root=live:/dev/sda1 rootfstype=auto ro rd.live.image rhgb splash=silent logo.nologo rd.luks=0 rd.md=0 rd.dm=0
initrd (hd0,1)/isolinux/initrd0.img
}
fi
Finally, I synced filesystem and rebooted. And now I had some kind of recovery partition which could be used to install a system or launch it in Live mode. Just not forget that we should not format sda1 partition when installing a system!
Rosabootstrap - setup a ROSA chroot in any Linux
It’s not a secret that some developers of ROSA and OpenMandriva work on our distributions every time they have a small chance to do this. And it is not surprising that sometimes they just don’t have a ROSA/OpenMandriva system under the hand when they have a half an hour to spend it to development. Downloading ISO image and setting it up is not a good solution, since it requires some time and machine resources.
However, now they can setup a minimalistic chroot with ROSA or OpenMandriva in any Linux distribution which provides Shell and Python (even rpm is not necessary!). Thanks to Robert Xu, now we have omvbootstrap and rosabootstrap tools that allow doing this easily.
In case of ROSA, just clone the rosabootstrap project:
$ git clone https://abf.io/soft/rosabootstrap
$ cd rosabootstrap
or download and unpack the tarball:
$ wget https://abf.io/soft/rosabootstrap/archive/rosabootstrap-master.tar.gz
$ tar xzvf rosabootstrap-master.tar.gz
$ cd rosabootstrap-master
And launch the script with necessary parameters:
$ sudo ./rosabootstrap -d -a x86_64 -v 2012.1 -c 2012.1 -m http://mirror.yandex.ru/rosa/rosa2012.1/repository/x86_64/main/release
That’s all — now you should have 2012.1 folder with chroot, so just go to it and enjoy the coding:
$ sudo chroot 2012.1
