Two-factor authentication setup in OS ROSA Desktop Fresh R9
Every security administrator is very well aware of the fact that a lengthy passwords are not more secure than a shorty ones, not at all. Better security requires two-factor authentication. Many people are already familiar with it (2FA) since the online shopping process with a credit card requires not only a simple Cv2 code but often a single use text message from the bank security system or some other additional authentication factor (howdy, fingerprint authentication?).
Of course, the data on the hard disk of stolen from you laptop cannot be protected that way, we need a cryptography here, but, if somebody is trying to spot your password from behind your shoulder in order to use it later — the two-factor authentication is a right choice.
So, what do you need to set up the two-factor authentication in ROSA? Disclaimer: information security specialists can now read last part of this article :)
Up to a challenge? Follow the instruction below!
Contents
- 1 Why do you need the two-factor authentication and what is its purpose?
- 1.1 List of supported ROSA versions:
- 1.2 Installation prerequisites and requirements
- 1.3 Restrictions and limitations you should be aware of
- 1.4 Benefits you should be aware of
- 1.5 The setup and operation principles of the two-factor authentication in OS ROSA Desktop Fresh R9
- 1.6 Mobile phone or tablet software required for the two-factor authentication
- 2 Setting the two-factor authentication on the ROSA Desktop Fresh R9 Gnome
- 2.1 Installing the software and clock synchronization
- 2.2 Installing programs on the phone or tablet
- 2.3 Recommended phone/tablet software
- 2.4 Generating the QR code (key) for computer administrator account (root)
- 2.5 Entering the QR code (digital key) into the your phone
- 2.6 Creating the QR code for everyday user on the computer and entering it into the phone
- 2.7 Setting up the GDM display manager to work with two-factor authentication
- 2.8 Setting up the two-factor authentication and switching the user context in a text console
- 2.9 Setting up the two-factor authentication for sudo
- 2.10 Setting up the two-factor authentication for remote SSH login
- 3 Setting up the two-factor authentication in ROSA Fresh with KDE or PLASMA desktop environment
Why do you need the two-factor authentication and what is its purpose?
Two-factor authentication (multi-factor authentication) its a tool to make the login process (and many other use cases which require the verification of certain identity) more secure. Every time you use the two-factor authentication, this makes your password security much more higher compared to simply entering the password.
User passwords are needed for:
- Everyday login into OS GUI mode
- Unlocking the screen after the screensaver has blocked it
- Parallel login (i.e. into the virtual console)
- Remote login into the system (i.e. using the SSH)
- Login into the virtual console getty (ALT+F2...F6)
- Switch the user context, i.e. use su and sudo commands to perform some actions using the credentials of some other user
Now let's imagine some situations:
Suppose you suspect your password was stolen but by some reason you are unable to change it right now
Somebody is watching you from behind your shoulder or with the mirror while you are entering your actual password
Suppose your password was stolen while you were entering the keyboard symbols trying to connect to your home machine over SSH from an Internet café or from some friend's computer, and the stolen password can now be used by an intruder.
The Internet is full of easy to use free software for password interception, which grabs the entered symbols from your keyboard and write them into the file, and the file can be copied or transferred somewhere else afterwards.
The attacker can easily buy a keyboard specially designed to intercept the entered symbols and write them down to embedded USB stick. In the Internet are also available the USB switchers which do the same (or the attacker can solder it by itself using some spare parts etc)
You think your password is too simple or too obvious and can be mentally brute forced by some metallic bad dudes from the Megatron.
In all those cases the two-factor authentication can really help. And to know how to implement it you just have to read thorough out howto. By the end of it you'll become a wise security expert who just laughs in the face of a bad-ugly-hacker-bot trying to break into your system.
The multi-factor authentication (and the two-factor authentication thereof) is based on the principle that states that for an user to establish their identity there must be present a combination of a few correctly supplied factors:
- some secret known to the user, such as a password
- some physical object in the possession of the user, such as a USB stick with a secret token, a card, a key, etc.
- some physical characteristic of the user, such as a fingerprint, eye iris, voice, typing, etc. In this case we are talking about biometrical authentication or the biometrics.
In ROSA Desktop Fresh R9 we recommend a two-factor authentication with the one-time TOTP passwords valid for only 30 seconds. We consider this implementation to be the most acceptable and comfortable for the users.
This implementation of the two-factor authentication on ROSA does not require some complex configuration processes or using some rare software or hardware. Worth noting that two-factor authentication will not require the Internet connection to function.
List of supported ROSA versions:
At the moment the following versions are supported (earlier versions are not supported):
- ROSA Desktop Fresh R9 GNOME;
- ROSA Desktop Fresh R9 KDE (switch from KDM graphical login manager to LightDM is required);
- ROSA Desktop Fresh R9 PLASMA (switch from SDDM graphical login manager to LightDM is required)
- Any ROSA versions (Fresh/RED) based on 2014.1 or 2016.1 packages base with GDM or LightDM graphical login manager.
Installation prerequisites and requirements
In order to set up the two-factor authentication on ROSA Desktop Fresh R9 you will need:
- The package google-authenticator from the ROSA repositories.
- Mobile phone (a smartphone) or a tablet (Windows Phone©, Android© or Apple© iOS© device) which we will turn into a token with the key and will generate the one-time passwords.
- The clocks on both devices must be synchronized, that's a very critical factor, only very subtle shift in time is allowed between the two devices.
- For the clock syncing you should use the NTP Internet time servers, for example ntp.rosalinux.ru and ntp2.rosalinux.ru or any other NTP server of your choice.
- Tin foil cap (a joke)
Restrictions and limitations you should be aware of
Please keep in mind the following:
- If your token (aka your phone or tablet) will be lost or battery low, you would not be able to login into your system the normal way
- If the time difference between the two devices will become too big, you would not be able to login into your system the normal way
- Remember that while the security of your system will rise, the user-friendliness will decline. For login process you will need two devices instead of one (your computer) and every time you'll have to enter two passwords instead of only one.
- The user context switching tasks may become a pain, since you'll need the one-time password of the other user, too.
Benefits you should be aware of
- The level of security of your system will rise significantly. From now on you may not worry that your root or user password may be exposed or compromised.
- There is no need to buy some costly hardware or software, you'll do it yourself and for free (your neighbor may want it, too, for a beer (vodka is much better here, of course!) or 1000 roubles ;) )
- Your security is provided to you by you only, it's 100% yours, no third party cloud or another kind of service involved!
- You will be using high technology and security solutions in your everyday life and be proud of it
- You may motivate your friends and family to use the two-factor authentication, too.
- Share your experience with your friends, neighbors and cousins and receive free live exp and respect points!
The setup and operation principles of the two-factor authentication in OS ROSA Desktop Fresh R9
The general principles of two-factor authentication in ROSA are the following:
- The package google-authenticator needs to be installed
- The authentication algorithm is Time-based One Time Password Algorithm (TOTP), RFC 6238
- during installation and setup process the 80-bit key is generated per user, this key is displayed using the QR code (default option) or as a Base32 code of 16 (default value), 26 or 32 characters.
- The QR code is then displayed on the computer screen and is scanned with the phone (or the user enters the 16 characters code manually in the installed phone or tablet application)
- The software on the phone then calculates the HMAC-SHA1 based on the QR code (or 16 characters code)
- After that a part of HMAC is extracted and converted into one-time password of 6 (default value) symbols length, this password is then shown on the phone display
- This one-time 6 symbols password will be valid for 30 seconds (default value)
Mobile phone or tablet software required for the two-factor authentication
Below is a list of free (at the moment when this article was written) most popular programs for one-time passwords generation on mobile devices. We tried to list the software that scopes in almost full range of most popular models of phones. There are some non-free utilities, also, but we are not including them in our howto.
For the Android smartphones and tablets:
For Apple© iOS© smartphones and tablets:
For Microsoft© Windows Phone© or Microsoft© Surface© tablets:
Setting the two-factor authentication on the ROSA Desktop Fresh R9 Gnome
Installing the software and clock synchronization
Before you begin: make sure the time between your computer and phone is synchronized, otherwise your setup will fail.
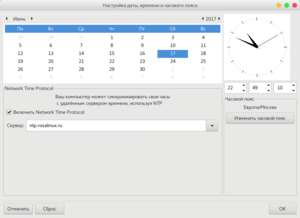
For this purpose you can use drakclock utility. To start drakclock, press ALT+F2 and enter 'drakclock'. Check if date/time and time zone settings are correct.
drakclock provides a list of a network time servers, chose one or two from that list or find another servers in the Internet and perform the clock synchronization. You can user ROSA time servers: ntp.rosalinux.ru and ntp2.rosalinux.ru.
Install google-authenticator:
urpmi google-authenticator
Installing programs on the phone or tablet
Before you begin: make sure the time between your computer and phone is synchronized, otherwise your setup will fail.
Consult your phone/tablet manual to learn how the clock synchronization works on your device. Perform the clock synchronization between your computer and phone/tablet.
Recommended phone/tablet software
For the Android smartphones and tablets:
For Apple© iOS© smartphones and tablets:
For Microsoft© Windows Phone© or Microsoft© Surface© tablets:
Generating the QR code (key) for computer administrator account (root)
Switch to the administrator (root) account:
su -
or
sudo -i
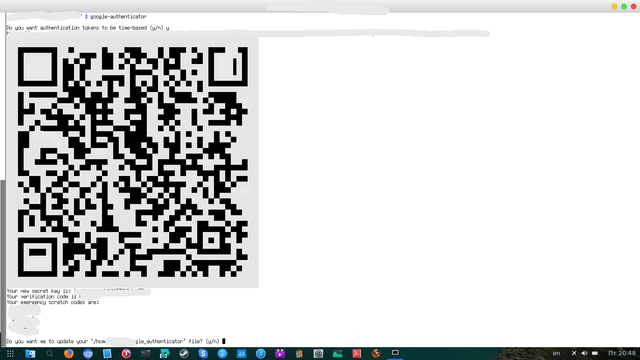
During the first step you should always setup the one-time password for the root, because if anything goes wrong later you may always fix it using the root privileges. Create the key for the root using the following command (in the xterm terminal):
google-authenticator
Entering the QR code (digital key) into the your phone
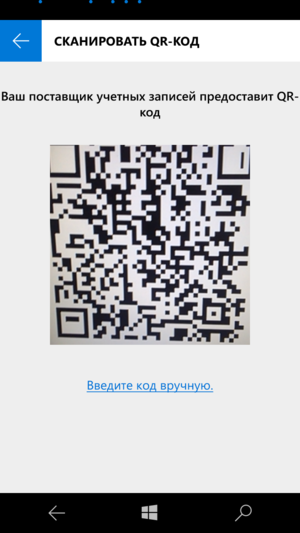
Run the recently installed application on your mobile device or the tablet, and follow the steps. Perform the scanning of the acquired QR code. In case your application does not support QR code scanning, enter the 6 digits key manually. This key is right below the QR code, here's the example of what the key string may look like:
Your new secret key is: ABCDEFGH12345678
See the example of the scanned QR code on the picture below:
Creating the QR code for everyday user on the computer and entering it into the phone
The process of code creation for the normal user is no different from the same process for the root. Run the xterm and switch the user context as follows:
su - <username>
Then with the acquired privileges of the other user, run:
google-authenticator
Another QR code will be generated for the user. The example of the code see on the picture above.
Then repeat the step of scanning the QR code or entering the 6-digits key into your phone or tablet.
Repeat the step as many times as many users you have in your system. After the setup will be finished, you won't be able to login into your system without the one-time password.
Do not forget to switch the user context every time you generate the code for an user.
Setting up the GDM display manager to work with two-factor authentication
If you use ROSA Fresh R9 and GNOME desktop environment, see the instructions below.
The configuration process requires the root privileges.
Edit the first 4 strings of the /etc/pam.d/gdm-password file as follows:
 #%PAM-1.0
 auth       required    pam_env.so
 auth       required    pam_unix.so
 auth       sufficient  pam_google_authenticator.so
 auth       sufficient  pam_succeed_if.so user ingroup nopasswdlogin
Remember, the PAM module settings no not require reboot in order to apply, all changes are applied immediately. You now have two-factor authentication for graphical login all set up.
Enter the first password as usual.
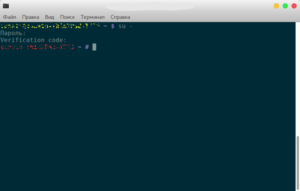
Start the application on your phone, select the user account you would like to login into and be ready to enter the one-time password. Remember, the password is valid only for 30 seconds. The mobile phone applications usually provides a time progress bar.
When the request for the TOTP password will pop up, enter the digits shown on the phone screen into the GDM textbox. The two-factor authentication for graphical system login is now set up for your system.
The basics are done, but if you want to configure the two-factor authentication for:
- The text console login and the switching the user context from the command line
- The sudo mechanism
- Remote login using SSH
...then please read below.
Setting up the two-factor authentication and switching the user context in a text console
This process requires the root privileges. Edit the first 4 strings of the /etc/pam.d/system-auth file as follows:
 auth        required      pam_env.so
 auth        required      pam_unix.so try_first_pass nullok
 auth        sufficient    pam_google_authenticator.so
 auth        required      pam_deny.so
The changes are applied immediately, so immediately after file saving is made, the text console login will be set up for a one-time password using.
The same configuration works for the switching context also, for the su command, for example.
Setting up the two-factor authentication for sudo
You will need the root privileges
visudo
Edit the string
Defaults env_reset
as follows:
Defaults env_reset, timestamp_timeout=0
The two-factor authentication for sudo was configured already when you applied the changes in the 'system-auth' file, but the change above forces the system to prompt for the password every time the sudo is used, which raises the overall system security level.
Setting up the two-factor authentication for remote SSH login
First switch into the root context.
Find the following string in the /etc/ssh/sshd_config file:
UsePAM no
and edit it as follows:
UsePAM yes
Restart the sshd service:
systemctl restart sshd
After the sshd has been restarted the two-factor authentication will begin working for the remote ssh connections to your computer.
Setting up the two-factor authentication in ROSA Fresh with KDE or PLASMA desktop environment
The configuration process for two-factor authentication in KDE or PLASMA environments is no different from the configuration process for GNOME, described above.
The difference is minimal. As usual, do not forget to synchronize the time between the two devices. You will need the root privileges for the setup process.
First install the LightDM graphical login manager:
urpmi lightdm
Then disable your current login manager and activate the lightdm: In case of PLASMA:
systemctl disable sddm
systemctl enable lightdm
In case of KDE:
systemctl disable kdm
systemctl enable lightdm
Edit the /etc/pam.d/lightdm file so the first 3 strings would look as follows:
 auth       required    pam_env.so
 auth       required    pam_unix.so
 auth       sufficient  pam_google_authenticator.so
After that you'll be able to reboot and get your two-factor authentication working for the graphical console.
The configuration process for text only console, context switching and for working with sudo and ssh are identical to those of the GNOME version.
Note for information security specialists
Strongly speaking, we say in an article above not about Two-factor authentication - a.k.a 2FA but Two-step authentication - a.k.a 2SA.
And, yes, we know the differences in between.
We also know, that real 2FA must be:
a) strong;
b) based on real independent factor, i.e. biometric or something like with key and sertificate on some token, or whatever else...;
c) confirmed by separately and independent tests in some security lab, etc...
But:
We also know, using the way above we try to help our users make their computers a little bit more secure, with no expensive software and hardware. And with no rocket science and terminology.
So that we do not try to explain a bit difference of 2FA and 2SA. This is for information security specialists.
Sorry than.
But the other hand is - user must use a portable device to obtain a OTP. Most of these devices are separately secured by fingerprint, key or some gesture. Is it a 2FA, huh..., isn't? :)
Best regards. ROSA Linux developers.


